This is an old revision of the document!
Table of Contents
GM Arts MFC for BJ Devices TB-12
version 3.3:
download available soon
Overview
This page describes GM Arts firmware version 3.3 for the BJ Devices TB-12 MIDI Foot Controller (MFC). The MFC has 12 footswitches that can send MIDI messages to control attached musical devices. This firmware can also receive messages from the Fractal Audio Axe-FX II to display certain information.
Included files:
- A “hex” firmware file to load into your TB-12
- A sample “eep” settings file to load into your TB-12
- A PC editor application to create and edit your own eep settings files
- The editor includes a built-in MFC emulator allowing you to test settings from your PC
The editor is a Windows program that requires Microsoft .NET framework version 4.5 or higher. If you don't already have it, you can download it from Microsoft here.
If you're interested in the code required to design your own firmware, I have several examples of earlier versions of this software here.
Features
This firmware for the TB-12 has two modes of operation:
- Basic operation: for a simple MFC, but still with many optional features
- Advanced options: for sophisticated MFC functions, highly configurable
It is recommended to start with basic operation then add advanced features if necessary. Here's a summary of the main features:
Basic operation has:
- 16 banks of 5 patches (total 80 patches)
- 10 effects including Tap
- Tap can switch on additional effects after a defined number of presses
- 4 different effect footswitch modes, including toggle and momentary
- Effect footswitches can send 2 messages, which can be CC messages or setting relay states
- CC messages can have any off or on value (allowing reverse operation, or switching between different levels - much more than typical off/on “IA” messages)
- Effects can belong to groups, to ensure only one effect is on in the group
- Bank select mode allows any bank selection with a maximum of 2 footswitch presses
- Supports 2 pedals, with optional effect switching at heel-down position
- Built-in pedal calibration and emergency disable for pedal faults
- Edit program numbers and their initial effect states on the MFC
- Can backtrack patches, optionally with their effect states and bank changes
- Supports Axe-FX II functions: tuner, patch names, effect states, tap tempo with tempo backtracking
Advanced options add these features:
- 16 banks of 10 patches (total 160 patches)
- Send additional messages and set relay states with program changes
- Set the order of events for program changes
- Up to 200 library messages, each of which can be one or more MIDI messages such as system exclusives, NRPN messages, CC messages, and can also include special commands to control the MFC
- Library messages can be sent instead of a CC message with patch changes and from effect footswitches
- Up to over 100 overrides (depending on complexity) - for example, an override could be: “In patches A3, B4 and H2, effect footswitch 3 will control a phaser instead of an overdrive”
You can view full documentation for this version here.
Coming Soon
I'm currently adapting this code for all TB models.
Quick Start
This firmware is written for the BJ Devices TB-12 model. It will not work with other models.
Loading Firmware and Settings
There are 2 files that need to be loaded into your TB-12:
- The firmware is a file that ends with “.hex” - it controls how the TB-12 works. You can always go back to BJ Devices factory firmware if you wish.
- Settings for the MFC are in a file ending with “.eep”. A sample file is included, and you can use the PC editor to create your own settings files.
Instructions for loading these files into your TB-12 can be found here.
Connections
- Connect a MIDI cable from you TB-12 MIDI OUT to your musical device's MIDI IN.
- If you have an Axe-FX II and wish to use those features on you MFC, connect another MIDI cable from you Axe-FX MIDI OUT to the TB-12 MIDI IN. Make sure that your Axe-FX is set to send both tuner and tap MIDI messages.
- Optionally connect one or both pedals to the TB-12.
- Then connect power to your TB-12.
You can now use your TB-12!
Play Mode on the MFC
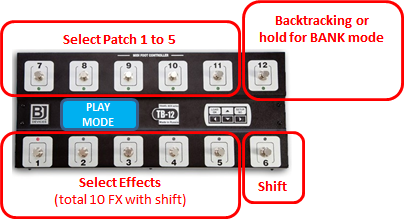
You will spend most of the time on the MFC in PLAY mode, where you select patches and switch effects off and on. Here's what the foot switches do:
The top left 5 buttons select a patch in the current bank.
The top right button is used for backtracking if you have it enabled. Backtracking switches between the last 2 patches you've used. Very handy when you play a short lead break and need to switch between lead and rhythm sounds.
Long-press (hold down) the top right button to go to BANK mode, where you can choose one of 16 banks. If you haven't yet selected a patch (or if you're not using backtracking) you only need to press this footswitch to go to BANK mode.
The bottom left 5 footswitches are used for effect switching. Usually these will be toggle effects (press to turn on, press again to turn off).
The bottom right footswitch is used to give you a different set of effects on the 5 effect footswitches. In total, there are 9 effects available plus a Tap footswitch.
LEDs in Play Mode
There is a LED for each footswitch. This is how they work in PLAY mode:
The currently selected patch will light red. If you turn effects off and on, the patch LED will flash to indicate that you can press the patch footswitch again to reset effect states.
The Bank LED will flash if you've changed banks to indicate that the current patch is not in the new bank. This means that if you press a patch footswitch, you'll select a patch from the new bank.
The patch LEDs light green when effects are on. The Tap LED lights when it has set a tempo. This is configured in settings where you can set how many tap presses are required after a patch change to set a tempo and optionally turn on additional effects.
The Shift LED flashes green when shifted.
LCD in Play Mode
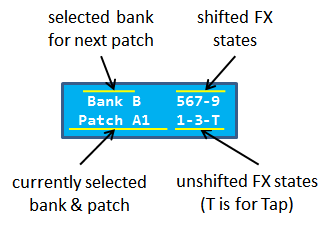
The LCD shows the current patch, the bank selected for the next patch and effect states.
The example shows effects numbered 1 to 9, but you can customise these to whatever you want with the editor. You could show “D” for Drive, “B” for Boost, etc.
If you're using an Axe-FX and the tuner is on it will display on the bottom row of the LCD. The top row will still show the bank as well as the 5 effects NOT displayed on effect LEDs. For example, if you have Shift on, the 5 effect LEDs will show the shifted effect states as usual, and the LCD will show states for the 5 un-shifted effects. When the tuner is turned off, the display returns to normal.
Bank Mode on the MFC
From PLAY mode, press the top right footswitch to go to BANK mode. If you're using this button for backtracking and you've already selected a patch, you'll need to long-press this footswitch to go to BANK mode.
There are 16 banks labelled from A to S (some letters such as “O” are skipped to avoid confusion with numbers). BANK mode gives you two different ways to select a bank:
- Press up and down to choose the bank you want, then Save
- Press a select button for the bank you want
You can press Exit to return to PLAY mode without changing bank.
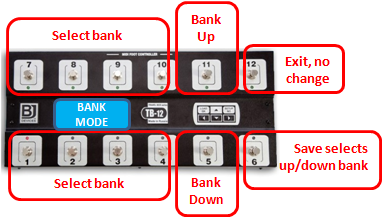
The screen shows banks that can be selected with the 4 top left footswitches. In this example they select banks A to D. Likewise, the 4 bottom left footswitches select banks E to H. When you select a bank this way, you return immediately to PLAY mode.
There are 2 sets of bank letters: banks A to H shown in the example, and banks J to S. To switch between these 2 sets, press either the bank up or down footswitch. This way, you can select any bank with a maximum of only 2 presses.
The bank-up and bank-down footswitches can also be used to select a bank, but of course you may need to press them a few times to get to the bank you want. The bank you've chosen is shown at the right of the display (bank C in the example). Press Save to choose that bank and return to PLAY mode.
There's a shortcut with bank up and down: If you long-press either of these footswitches, it will select the next bank and return you to PLAY mode.
And one final shortcut: If you press and long-press Save, it changes to the bank containing the current patch, and returns you to PLAY mode.
Sample File Settings
Sample EEP settings files are included for the Axe-FX, Kemper and general MFC use.
The Axe-FX sample file should be a good start and uses Basic settings, but of course you can modify these with the editor and use Advanced features if necessary.
- MFC patches A1 to S5 select Axe-FX patches 001 to 080
- Effects 1 to 4 are scenes 1 to 4
- Tap is on footswitch 5, and it turns on the Delay effect after 2 presses
- The shifted effects from left to right are: Drive, Filter (for boost), Chorus, Reverb and Tuner
- Pedal 1 is volume using CC number 7, and will need to be attached as a controller to a volume block in the Axe-FX
- Backtracking is enabled
- If you connect a MIDI cable from the Axe-FX MIDI OUT to the MFC MIDI IN, you will see the Axe-FX tuner, tap tempo, patch names as well as have tempo backtracking
Basic Operation
This section describes Basic settings in detail. Open the editor program and choose “Basic Operation”. There are several tabs for you to select and enter your settings. When finished, use the File menu to save your settings in an “eep” file, then load it into your TB-12.
MIDI Settings
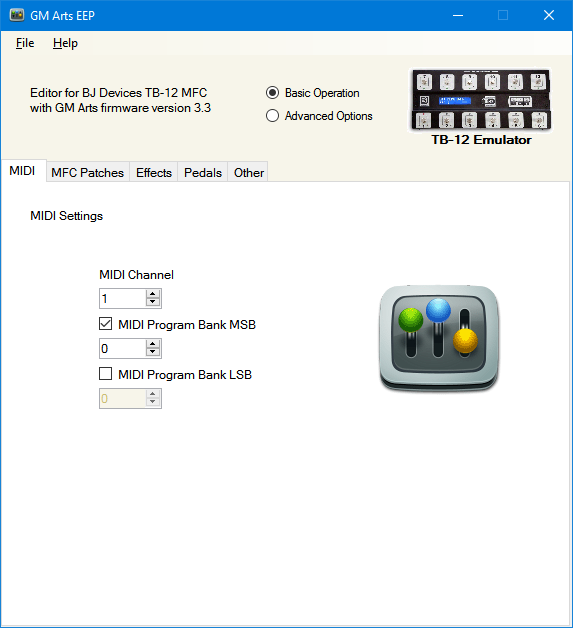
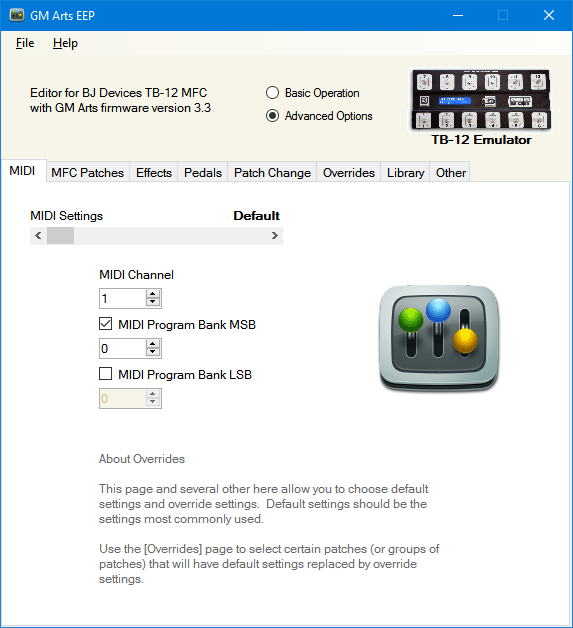
This tab is used to set the MFC MIDI channel to the same channel as your connected equipment. You can also set MIDI MSB and LSB numbers used for patch selection if your equipment uses them. There is more flexibility with these options in Advanced mode, but this will suit a setup with only one connected device.
MFC Patches
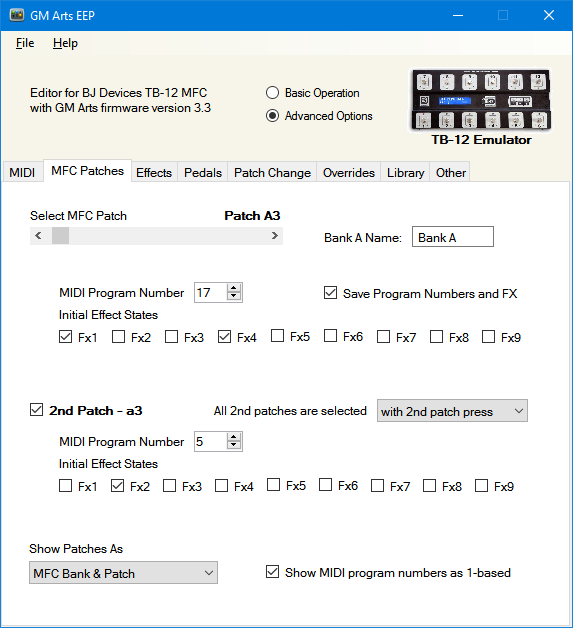
MFC patches are split into 16 banks. For example, MFC patch A3 means patch 3 in bank A. Each MFC patch can send a MIDI message to select any program on a connected device.
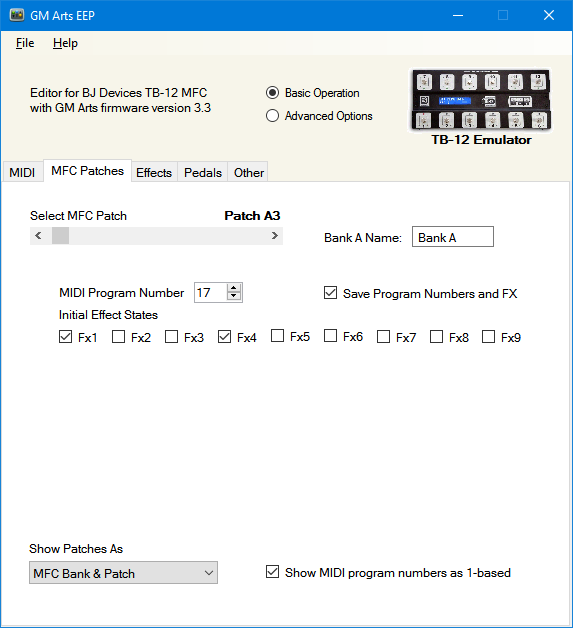
This tab is used to set which MIDI programs are called from each MFC patch, along with other program-related settings. The example shows that MFC patch A3 selects MIDI program number 17.
You can also set initial effect states for each patch here as well, although that is optional. However, there are many benefits in setting initial effect states. You can read more about that in the About Effects section.
This tab also allows you to set bank names. Hint: If you click on the scroll bar to the left or right of the slider, you will move one bank at a time, making it easy to scroll through each bank.
You can also set MIDI programs and effect states on the MFC itself, without using the PC editor. So you can choose to NOT save them in the settings file by un-checking “Save Program Numbers and FX”. That way, you don't need to keep editor and MFC settings synchronised.
Use the dropdown list to select how patches are shown on the MFC. You can choose:
- MFC Bank & Patch*, for example: Patch C4
- MIDI Program Number*, for example: Prog: 017
- Axe-FX Program Number*, for example: Axe-FX 017
- MFX Patch & Axe-FX Name, for example: C4 RokSolo
* If you select to show Axe-FX program names on the Other tab, it will replace these selections when and if it is received.
Check “Show MIDI program numbers as 1-based” to show MIDI program numbers as 1 to 128 in both the editor and on the MFC. Otherwise, program numbers will show as 0 to 127. Match this setting to the way your connected equipment shows its program numbers.
Effects
Off & On Settings
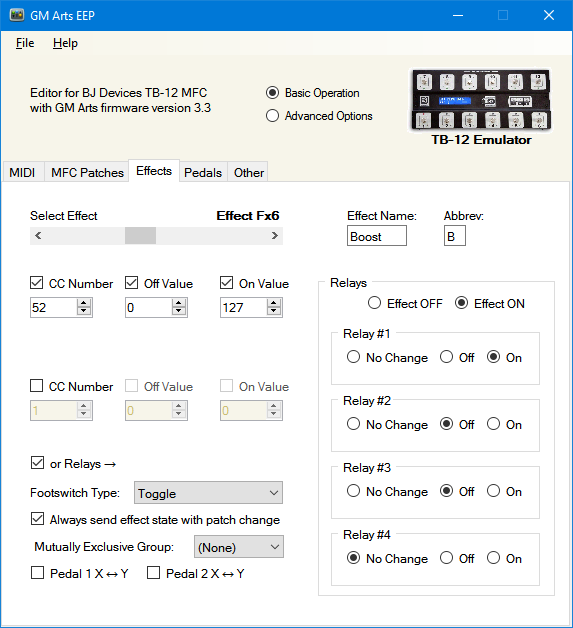
The word “state” is used often in relation to effects. It simply means whether they are OFF or ON. The TB-12 MFC also has 4 inbuilt relays that can have their states set to OFF or ON. Relays can be used to control external equipment that use footswitches, such as channel switching on an amplifier.
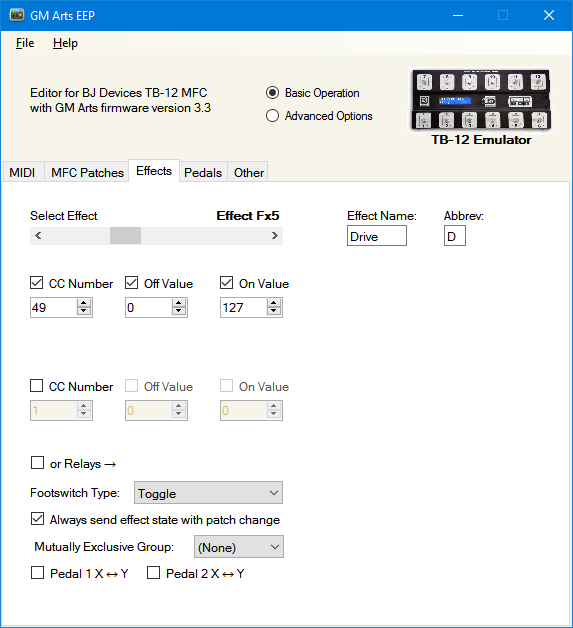
MIDI CC messages are sent to turn your effects off and on. Some manufacturers call these “IAs” but they are fully implemented in this firmware and can do much more than just off and on if you wish. Each effect footswitch can send:
- 2 CC messages, or
- 1 CC message and set any or all relay states
A CC message has a number and a value:
- The number defines what you want to control. You need to match these numbers with your MIDI equipment. For example, you might have your overdrive effect set to CC number 25, a chorus effect set to CC number 50, etc.
- The value controls what happens to that effect. The most common settings are 0 for OFF and 127 for ON.
This MFC allows you to set any OFF or ON value you wish. This means:
- You can use the standard 0 for OFF, 127 for ON
- You can reverse OFF and ON values for reverse operation. For example, you might use an equaliser effect for rhythm playing. This equaliser maybe lowers the volume and cuts some mids. Reversing the values allows the MFC to display ON while you're soloing with the equaliser OFF.
- You might want the effect to switch between 2 different values. For example, this could be used for a boost effect by switching volume levels, or it could control the level of reverb to switch between a surf reverb and ambient reverb. It could switch between two different speeds for a rotary effect, and so on.
- You might want to switch between 2 scenes on the Axe-FX. For example, scene 1 needs a value of 0, and scene 4 needs a value of 3 (the values are one less than the scene number).
Effect Names and Abbreviations
You can give each effect a short name (up to 6 characters). This name will display an the MFC when you press the effect footswitch, also showing whether it's off or on.
Effect abbreviations are displayed on the MFC in the same footswitch layout for both unshifted and shifted effects.
Footswitch Types
Toggle
This is the most common type of effect footswitch. It works like a typical stompbox. Press once to turn on, press again to turn off.
Persistent Toggle
This is the same as a toggle, but it “remembers” its current state when you go to your next patch. For example, if you turn on a persistent chorus effect, then change patches, chorus will still be on, even if it would normally be off in the new patch.
Momentary
These effects are ON when the footswitch is pressed. Press to turn ON, release to turn OFF. You can reverse this operation if you wish by setting the initial state to ON - this is done on the MFC Patches tab.
Select
These footswitches are press to turn ON. If you press again, the ON messages will be sent again and the effect will remain on. These are for situations where there is an ON message to make a change, but no off message, such as selecting scenes on the Axe-FX, or selecting actions for a looper.
The main use for these footswitches is when you have several Select footswitches in a group. Only one effect can be on at the same time in a group. So if you have 4 footswitches in the same group set for scenes 1, 2, 3 and 4, the currently selected scene will show, and other footswitches in the group will be off. Select effects can only be turned OFF within a group, or by selecting a new patch.
Always Send
Check “Always Send After a Patch Change” to guarantee that your initial effect states set on the MFC Patches tab will be set when you select a patch. Leave this unchecked if you don't need to force an effect off or on when you select a patch.
Groups
Effects can belong to a group. There are 7 groups available. When you turn an effect ON in a group, any other effects in the same group are turned OFF first. So groups are used when you only want one effect on at a time. Groups can be used by Toggle, Persistent Toggle and Select effect types, but not for Momentary effects.
Pedal X/Y
You can use effects to switch a pedal between two different settings, such as between volume and wah control. If you use the X/Y settings, the pedal will use X settings when the effect is off and Y settings when the effect is on.
It's not recommended to use more than one effect to control X/Y switching for the same pedal - it might get confusing! Pedal X/Y switching is ideal for when you use the same pedal for different purposes. You can read more about pedal X and Y settings below.
Relays
Each effect can send 2 x CC messages, or a CC message and set relay states. Here are the options for setting relays. Don't forget to make settings for both Effect ON and Effect OFF.
Tap & Tap Effects
Use the slider to select each effect. After effect 9, you will find settings for Tap and Tap FX.
Tap is fixed as a momentary footswitch and should be set for the CC number your equipment needs to set its tap tempo. Normally only an ON value is required, usually with a value of 127. You could use the second CC message for an additional hold effect, because this is unlikely to affect tap tempo. I use mine for an infinite repeat effect.
Tap Effects (shown as Tap FX) are additional effects that you can turn on after a preset number of tap presses after a patch change. The number of presses is set on the Other tab. For example, you can set this so that after 2 tap presses, it turns on your delay effect.
Tap FX is fixed as a Select type of footswitch. It is turned on after the preset number of tap presses, and can be turned off only with in a group (by selecting another effect in the same group) or by selecting a patch. You can disable Tap FX by setting the number of Tap presses to “Off” on the Other tab.
Heel Effects
Heel effects can be used to turn an effect on when the pedal is in use, and off when the pedal is off, in the heel down position. You can buy pedals with a spring return that parks them in the heel down position when you lift your foot from the pedal. This way, you don't need to use a separate effect footswitch, you simply operate the pedal when you need the effect.
Heel effects are ideal for a pedal that you only use for a certain effect such as wah or whammy, and otherwise leave off.
You'll see in the next section that pedals have 2 groups of settings (X and Y) to allow multiple use of the same pedal. Heel effects work from X settings only.
Some Examples
A common example is to have a heel effect turn on a wah effect that you control with the pedal. When the pedal is parked in its heel-down position, the wah effect is off.
A creative example is to have a pedal set as volume, and use the heel effect to turn a tuner ON at the heel down position. That way, you're automatically muted when tuning and you don't need to use a separate effect footswitch for the tuner. This is done by reversing the off and on values for the tuner, because you want the tuner ON when the heel effect is OFF and vice-versa.
Pedal Settings
The TB-12 has connections for 2 pedals. Before using the pedals, they should be calibrated on the MFC to ensure they control effects over their full range. See MFC Setup for a guide on this.
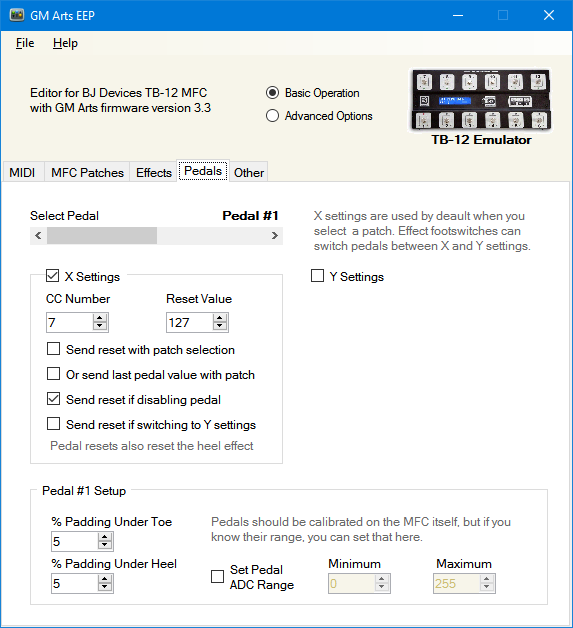
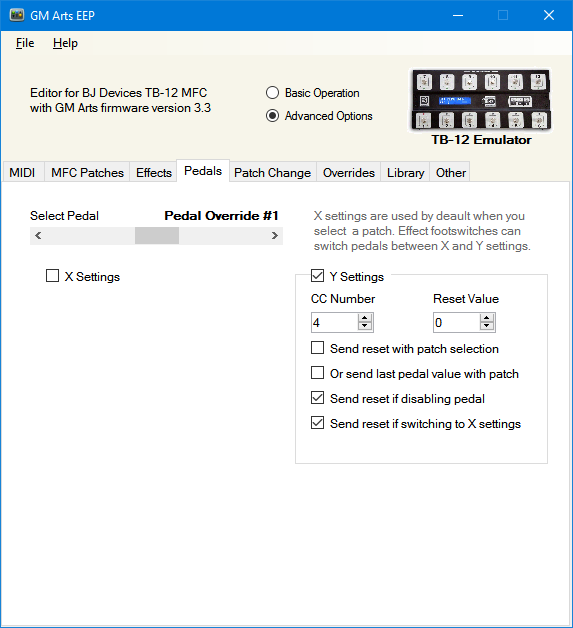
There are 2 groups of settings available for each pedal, called X settings and Y settings. When you select a patch, X settings are used by default. If set up, turning an effect on can switch a pedal to Y settings.
The most important setting is the CC number. This must be matched to the CC number used by your connected device to be able to control your effects, such as volume and wah. That may be all you need, but you can also set a specific reset value and use options to reset the pedal if necessary:
- Send reset with patch selection: This can be used to ensure that the pedal starts at the same level whenever you select a patch.
- Send last pedal value with patch: This is useful for maintaining the current setting in a new patch. For example if you have your volume set half-way, the same value will be sent with a new patch to avoid a sudden volume change.
- Send reset if disabling pedal: There is a pedal disable function you can use quickly in a live situation if your pedal fails. This setting is used to send the reset value if you disable the pedal.
- Send reset if switching X/Y settings: This can be used to make sure the pedal has the reset value when being turned off to use the other group of pedal settings.
Each pedal has some additional settings for the percentage of padding under the toe and heel. Padding is how much sweep you want with no further change to the pedal value. A small value here ensures you will always be able to get the minimum and maximum values at each end of the pedal's travel. You might use a higher number here if you have an under-pedal footswitch to allow you to get the full pedal value without activating the footswitch.
It is strongly recommended to calibrate pedals on the MFC itself, however, if you happen to know their range, you can also set that in the editor.
Other Settings
Tap Settings
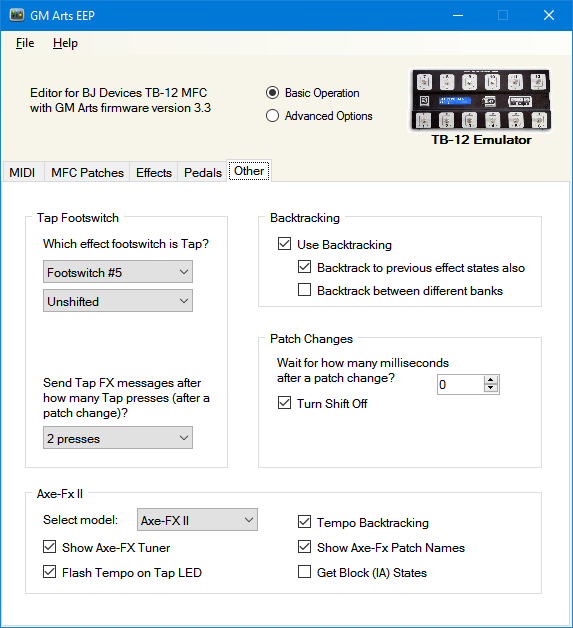
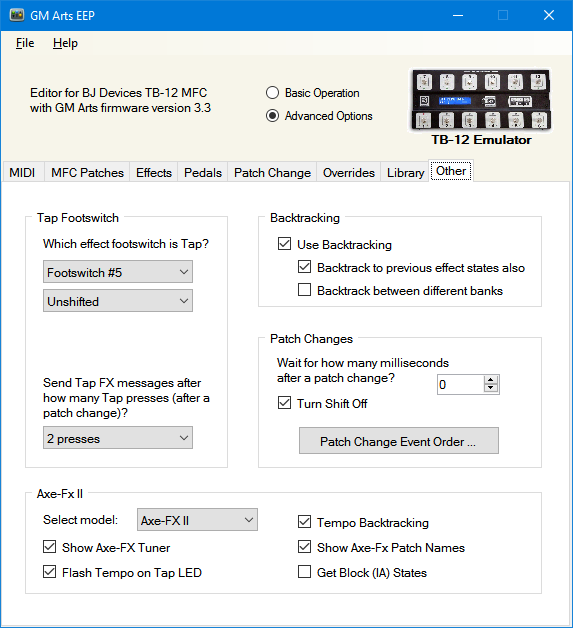
Set which footswitch you want to use for Tap. If you select a tap footswitch that is both un-shifted and shifted, then F9 will not be available.
You can set Tap Effects off, or choose a number of tap presses and a patch change that are required to turn Tap FX on. See above for more information on use of the Tap footswitch.
Backtracking
Backtracking is a powerful feature that allows you to switch between the current and last patch, optionally with their effect states including Tap FX and even Tap Tempo if you have an Axe-FX.
Every time you press a Patch footswitch a snapshot is taken of your previous patch with its effect states. When you press Backtrack, it captures your current patch and effects, then switches to the previous patch.
You can even use backtrack to switch between different effects on the same patch by selecting the current patch again and making different effect selections.
Normally you would allow backtracking between different banks, but if you use banks for different purposes such as different guitars or different MIDI equipment, you might want to disable this option.
Patch Change Settings
Modern MIDI equipment will not normally need to wait after a patch change, but some older equipment might need a pause before accepting other MIDI data such as effect reset messages. Set a delay if you find effects are not being reset consistently.
The “Turn Shift Off” setting means that if you select a patch, shift will be automatically turned off if it was on.
Axe-FX Settings
Select your Axe-FX II model from the drop-down list and select the options you want.
Axe-FX turned will show automatically on the bottom row of the MFC display whenever the tuner is on, even if you turn it on from the Axe-FX itself.
Flash Tap Tempo shows the Axe-FX tempo on the Tap LED once a tempo has been set if you're using Tap Effects, or all the time if you've disabled Tap Effects on the Other tab.
Tempo Backtracking is used when you have backtracking enabled. So when you backtrack to a patch that had a tempo set, it will set the same tempo for you automatically.
Axe-FX patch names can be shown with patch selections, subject to space limitations on the MFC display. The patch will initially show on the display and will be replaced by the Axe-FX patch name when and if received.
Get Block States is used to display Axe-FX effect states on the MFC when you select a patch. Please also read the section on Getting Effect States from the Axe-FX. This option is good for simple effect off/on patches, but will not suit more sophisticated effect options.
There are several tips for Axe-FX II owners in this section.
MFC Setup
You can make some setting changes directly on your TB-12 MFC.
MFC Patches
On the MFC, press [SETUP] and you will see the MIDI program number for you current MFC patch, with effect footswitches showing initial effect states. Effects 1 to 9 are in their usual positions, and tap is blank (its initial state is always off).
Use the [LEFT] and [RIGHT] buttons to change the MIDI program. The 2nd patch has an option for OFF as well as the normal MIDI program numbers. Use the effect footswitches to set their initial states.
Press [UP] and [DOWN] to select the 1st patch and 2nd patch. Pressing [UP] and [DOWN] further will take you to pedal calibration settings (see next section).
When you have settings you want, press [OK], or to exit without saving settings, press [NO].
TIP: If you're managing your patch numbers and effect states on the MFC, you can exclude them from the PC Editor by unchecking “Save Patch Numbers and FX”. That way you won't lose settings by not having them synchronised between the MFC and the editor.
Pedal Calibration
This should be done the first time you use the MFC firmware and whenever you change pedals.
On the MFC, press [SETUP] then use [UP] and [DOWN] to get to screens that allow you to calibrate Pedal 1 and Pedal 2.
Make sure the pedal is connected and press [RIGHT] to start. You'll first see the current minimum and maximum pedal values, then the current pedal value. Sweep the pedal a few times from minimum to maximum to set its range. When finished, press [LEFT] to return. Repeat for the other pedal if necessary, then save your settings with [OK], or press [NO] to exit without saving.
Pedal Failures
Pedals are subject to failure or temperamental behaviour due to scratchy pots, mechanical problems and connecting cable faults. The quick fix to disable all pedals is to press [OK] twice - you could even do this in the middle of a solo!
How it works:
Pressing [OK] displays a screen to disable BOTH pedals. You can press [UP] and [DOWN] to scroll through different choices of which pedals to disable: BOTH, NONE, PEDAL 1, or PEDAL 2.
Press [OK] again to disable the selected pedal(s). If configured, this will also send a reset value for the pedal, for example, maximum volume for a faulty volume pedal. If pedals are not disabled, they will be re-enabled. This is a temporary change only - configured settings will be used next time the MFC is restarted.
Press [NO] to exit this screen without making changes.
About Effects
Where Are My IAs?
IA is a term sometimes used for MIDI messages that toggle an effect on and off. There is no such thing as a MIDI IA message, so I use the correct term: CC for control change. This is also more applicable to my firmware that can send any value for off and on.
Controlling Effect States
Effect states are set like this:
- If selecting a patch, any persistent effects will keep their off/on state from the previous patch, other effects will set their initial state set for the patch and send their off/on messages if set to “always send after a patch change”.
- If backtracking with effects, all effect states (including Tap Effects, if used) will be set as they were in the backtracked patch.
There are different ways to use these settings to control which effects are on and off when selecting a new patch. You can even use different methods for each effect.
This MFC can fully control which effects are on and off when selecting a patch. To do this:
- On the Patch Numbers tab, set the initial effect states for each patch however you want
- On the Effects tab check “Always send effect state with patch change” for effects that you want to force off or on, to match their initial settings.
Even though this means you need to keep your effect states synchronised with your patches, there are many benefits to this approach:
- The MFC displays effects in their initial states when you select a patch. That way when you press an effect footswitch it will correctly turn the effect off or on. You won't have to press a footswitch twice to get it to synchronise with the way your patch is set.
- The MFC “knows” what the normal effect states are, and indicates (with a flashing patch LED) when you've changed effect states. You can then press the patch footswitch again to instantly reset your patch.
- There are no surprises playing live, even if you accidentally save a patch with the wrong effects off and on. Recalling them with the MFC will always set the effects that you want and expect.
- You can set up several MFC patches with the same MIDI program, but with different effect combinations in the same program on your connected equipment. This is similar to scenes on the Axe-FX, but you can a large number of them, with even more options in advanced mode.
You don't need to set “Always send effect state with patch change” for every effect, but you will lose some of the benefits from the MFC “knowing” what initial states should be.
Getting Effect States from the Axe-FX
If you own an Axe-FX, you can have the Axe-FX set effect states on the MFC. To do this:
- On the Effects tab un-check “Always send effect state with patch change” for all effects
- Use effect CC values 0 for OFF and 127 for ON (you can use them oppositely if you wish)
- On the Other tab for Axe-FX, check “Get Block States”
This works for very basic on/off effects and may be all you need. The MFC will learn initial effect states as you use patches, so they don't even need to be set correctly in Patch settings. It will identify which effect is which by the effect CC message with a matching CC number, and set it to off or on by looking for values 0 and 127.
There are some disadvantages of this method, in addition to missing some of the benefits listed above. The Axe-FX only sends basic effect state information. It won't be able to show effect states on the MFC:
- If you use a footswitch to toggle between different levels, such as OFF for a low ambient reverb level and ON for a higher “big reverb” level. In both cases the Reverb block is on, so the Axe-FX can't tell the MFC whether your “big reverb” reverb effect is off or on.
- Some effects, such as the mixer, don't even have an off state, so there's no way to show any changes you might make with these effects.
- You might use a footswitch to change settings in multiple effects, such as boosting delay feedback and also changing rotary speed. This type of effect modifier doesn't correspond to a simple on/off effect.
- An effect might change relay states or send system exclusive messages, so again, the effect information from the Axe-FX won't be able to tell the MFC what's off and on.
Why Can't I Choose CC Numbers 0 and 32?
Well firstly, the MFC does send CC message numbers 0 and 32 - they're the MSB and LSB bank numbers on the MIDI tab. They are used to access more than 128 patches on connected equipment.
CC numbers 0 and 32 are reserved for MIDI patch banks and are not available as effect controller numbers. Using those numbers for effect controllers can cause unpredictable patch selection in connected equipment. Any other number from 1 to 31 and 33 to 127 can be used.
Advanced Options
This section describes the editor settings with Advanced Options. Selecting Advanced Options makes several changes:
- You can set a 2nd patch for each patch footswitch on the MFC Patches tab
- New tabs are available, for Patch Changes, Overrides and Library messages
- You can select library messages on the Effects tab
- You can make override settings on the MIDI, Effects, Pedals and Patch Changes tabs
- There's an option on the Other tab to set patch change event order
You can freely switch between Basic and Advanced modes without losing the main settings, but you should review all settings before saving as a precaution.
Advanced features will usually require some time, effort and planning to get the most out of your MFC. These options provide extremely flexible and powerful options that allow control over multiple connected devices that can operate differently on every patch if you wish. As always, start with basic ideas and build from there.
The only change to MFC operation when using advanced features is the ability to choose a second patch on each patch footswitch. Depending on your settings, a 2nd patch can be selected by multi-pressing a patch footswitch or with 2nd patches available in Shift mode.
MIDI Settings
Advanced mode adds the ability to make override settings available for use. You can use the override settings for different MIDI channels, different bank numbers, or both. To use an override, go to the Overrides tab.
MFC Patch Settings
In Advanced Options, each patch footswitch can send a 2nd patch. Decide whether you wish to select the 2nd patch with a 2nd press (like double-clicking your mouse), or select it when Shift is active on the MFC.
When using a 2nd patch with 2nd press, each press of the patch footswitch will toggle between the 1st and 2nd patches. You don't have to use a 2nd patch on every footswitch, just whichever ones you want.
For backtracking purposes, a double-click counts as a single patch selection. So you can freely move to and from 2nd patch selections with backtracking working as you expect.
Effect Settings
The main differences for advanced effects are:
- You can set up additional override effects available to be used instead of the default effects.
- You can send library messages which allow multiple MIDI messages on any channel, system exclusive messages, etc
Note that for a persistent effect to carry from one patch to another in advanced mode:
- The effect must be set to “Persistent Toggle” (obviously)
- The same effect must be on the same footswitch in both previous and current patches. They can both be the default effect, or they can both be the same overridden effect.
Pedal Settings
The only difference with Advanced Options is the ability to make override settings available for use.
Patch Change Settings
This tab allows you to send additional messages when selecting a patch. You can set relay states and send 2 x CC or library messages.
Use the default selection for the most commonly used settings (which may be no settings). Then use the slider to select override settings for changes you may wish to apply to certain patches using the Overrides tab. You can also use the [Patch Change Event Order] button on the Other tab to set the order that these settings are applied.
Overrides and Library Settings
Other Settings
The Other tab has only one change compared to Basic mode: you can click [Patch Change Event Order] to set the order of what happens when you select a patch. For example, this allows you to send the extra patch change messages before or after effect resets.
Overrides
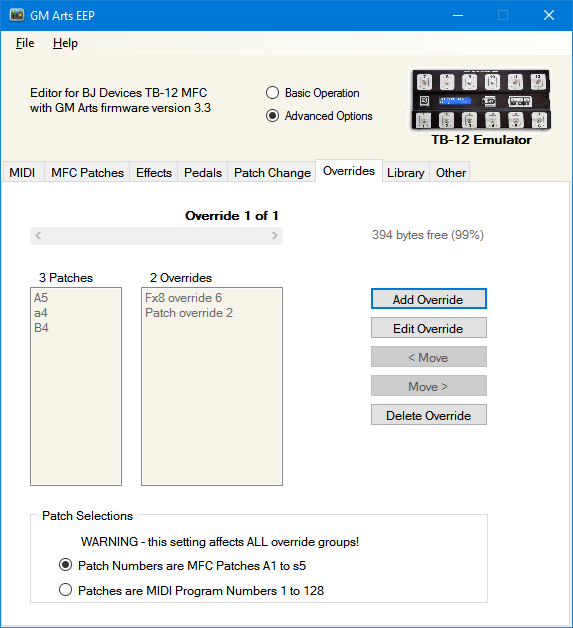
Overrides are only available when you select Advanced Options in the editor.
Overrides give you the ability to change default settings to do something different, such as:
- For patches A2 and B3, change the usual settings for effect 1 to a phaser and set pedal 2 to control whammy pitch
- For all patches in bank C, set relays 1 and 2 both on, and send a system exclusive message
- For patch D5, change all effect footswitches to something else, and send them on a different MIDI channel
- For patch G2, swap the positions of the overdrive and boost effect footswitches
These are very flexible and powerful options, so here's an example of how to make a simple change for patch A2, to use a phaser effect on effect 3, instead of whatever it normally does.
The first thing to notice is that on the MIDI, Effects, Pedals and Patch Change tabs, the sliders give you the normal default settings at the left and override settings as you scroll further to the right. When you make override settings, they are available to be used, but will not be used until you select them on the Overrides tab.
- So our first step will be to choose the Effects tab, scroll to Override #1 and make CC settings to turn your phaser effect off and on.
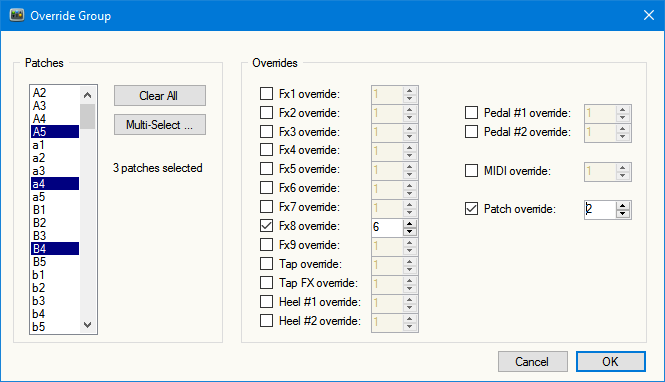
- Then go to the Overrides tab and press [Add Override].
- Select the patch(es) you want to modify, patch A2 in this example and check Fx3 Override, setting it value to 1, because we're using effect override number 1.
- Click [OK] and that's it - you'll now see you have set up this override and effect 3 will control a phaser in patch A2 only.
BUT WAIT …
Just before you get too excited and set up lots of overrides, take some time to decide whether you want to select MFC patch numbers or MIDI program numbers. This selection affects all existing overrides, and changing it can affect some of your settings.
- Using MFC patches is the easiest to manage and has some handy multi-select options such as “All patches in bank C”. This is the recommended option.
- Using MIDI program numbers might make sense if you only have one connected device and want certain MIDI programs on that device to have overrides, regardless of which MFC patch selects that MIDI program.
Now you can go ahead and set up the overrides you need. The process is always the same:
- Set up the overrides you need first. You can set up overrides on the MIDI, Effects, Pedals and Patch Change tabs.
- Go to the Overrides tab and add or edit your overrides.
You can use the [Move] buttons to change the order of overrides, and this is mostly for your own convenience. But note that if the same patch is in more than one override, only the last one will be used. For example if Override #1 is “for all patches in Bank B, use MIDI channel 2” and Override #5 is “for patch B2, set relay 1 off”, then only the last override will be used for patch B2.
Library
Library features are only available when you select Advanced Options in the editor.
Library Messages
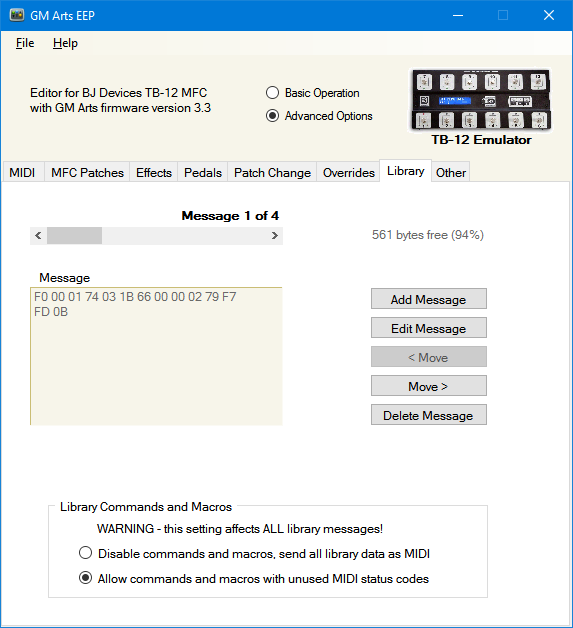
A Library message can contain one or more MIDI message of any kind, including System Exclusive, Patch Change, Continuous Controller, NRPN, etc. It can also include special commands to control the MFC, such as setting a bank or waiting a short time.
Library messages can be used instead of CC messages for Effects, and for extra messages after a Patch Change. They are entered as raw MIDI data, and there are several tools provided to enter common messages and values.
600 bytes are available for all Library messages, with a maximum of 255 bytes per message and a maximum of 200 messages.
Click [Add Message] to add a new message, or select an existing message with the slider and click [Edit Message] to modify it.
The order of messages doesn't matter, but you can use the [Move] buttons to arrange them however you wish. When you move and delete messages, the editor will update any library settings affected.
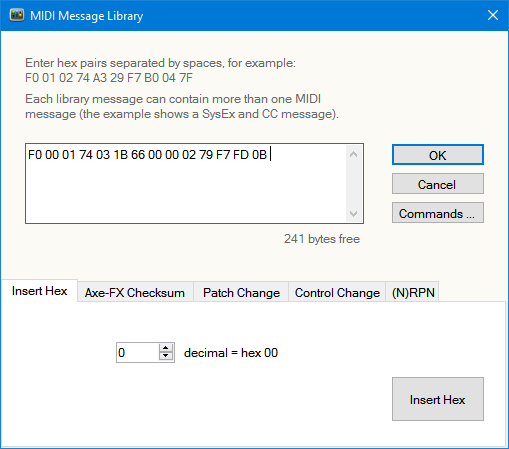
The following picture shows the main screen for editing library messages. They are entered as MIDI data in hex-pair format. In many cases you will be able to copy this data from documentation. There are also tabs that allow you to enter some common data and messages.
NRPN Messages
These messages are used by some manufacturers to allow a large number of parameters to be controlled in fine detail. Check your owners manual to find settings needed for these messages. Use the (N)RPN tab to construct your library message.
Select message type NRPN or RPN, or “Adjustment” to change the value of a previously sent (N)RPN message. Adjustment works provided you didn't use “Send Null RPN” with the previous (N)RPN message - see below.
“Use Running Status” is supported by most manufacturers and creates a shorter (and therefore faster) NRNP message.
“Send Null RPN” resets the (N)RPN number to prevent values sent later from changing the current message. Leave this unchecked if you want to be able to make adjustments in later messages. Or use this option as a safeguard against unintentional later changes.
The remaining settings are for MIDI channel, (N)RPN MSB and LSB, and for data (value) MSB and optional LSB. As always, take care with library messages that multiple MIDI messages occur one after the other, and not one inside another.
The picture above shows an additional built-in feature - if you highlight a hex pair, the decimal value is also displayed!
Library Commands
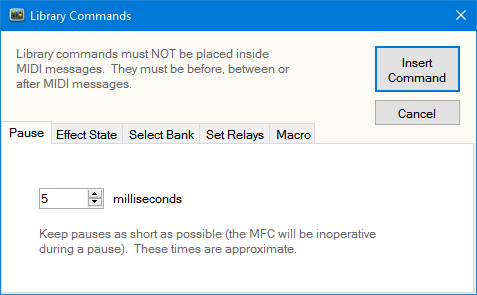
If you have enabled Library Commands on the main screen Library tab, you can click [Commands] to view this window:
This allows you to insert special commands to control different aspects of the MFC. These commands must never be placed inside a MIDI message, only before or after messages, or between two messages.
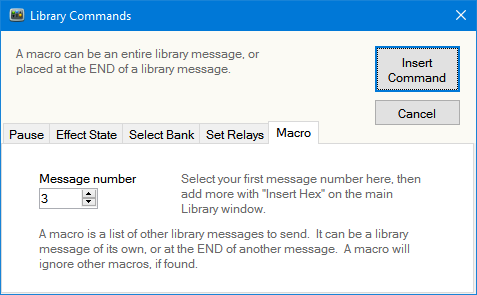
Library Macros
A macro allows you to chain several library messages together. This command can be a library message on its own or can be placed at the end of a library message. You can follow this command with as many other library numbers as you wish. A macro command ignores any other macros, as a safeguard to prevent locking the MFC in an endless loop.
Tips
TB-12 Emulator
You can click on the image of the TB-12 at the top right of the editor to open the TB-12 emulator. Select your Axe-FX MIDI out device if you have it connected, or you can still view MIDI messages if you leave it as “Microsoft MIDI Mapper”.
The emulator shows a visual interface similar to the TB-12 and sends MIDI messages. It also shows what messages are being sent with a text description. It does not receive MIDI, so it won't retrieve Axe-FX information like the actual MFC. It is a useful tool to test your settings, and designed short and wide to fit under your Axe-Edit screen!
MFC Tips
The MFC automatically disables functions under some circumstances. For example:
- Effects 1 to 9 won't do anything if they have no message types (ie they're not set to send a CC message, send a library message, or set relay states)
- If you use the editor to make Advanced settings such as overrides and library messages, but save it in Basic mode, the MFC will ignore advanced settings.
- If you have the same settings for a 1st and 2nd patch on the same footswitch, the 2nd patch will be ignored
- If you select 2nd patches in Shift mode, then selecting a patch will not reset Shift to off
Tips for Axe-FX II Owners
This section will help Axe-FX II owners get the most from their unit with the GM Arts MFC firmware. Also, the Axe-FX is able to do many of the same things that the MFC does, so it's important to choose one method or the other. For example, both the MFC and the Axe-FX can automatically turn on delay effects when tap tempo is set, so you don't need to use both methods at the same time.
Firstly, we need to make settings so that the MFC and your Axe-FX can “talk” to each other. To do this you'll need to match some settings between both units.
MIDI channel
The MFC sets its MIDI channel on the Editor MIDI tab. The Axe-FX sets MIDI channel:
⇒ I/O button > MIDI tab > MIDI Channel
Axe-FX Banks
While you're on the Editor MIDI page, you can also set the MIDI MSB Bank to choose the Axe-FX bank. The Axe-FX II has banks A, B and C, each with 128 patches. These banks correspond to MSB numbers 0, 1 and 2. The Axe-FX II XL models have 3 additional banks D, E and F, which correspond to MSB numbers 3, 4 and 5.
You can use overrides in the editor to allow any MFC patch to select any Axe-FX patch in any bank.
Display Offset
The MFC sets its MIDI program as 0-based or 1-based on the Editor MFC Patches tab. The Axe-FX sets this as display offset here:
⇒ I/O button > MIDI tab > Display Offset
CC numbers
MFC sets CC numbers on the Effects tab. You need to match these to the Axe-FX effects you want to control, and this is done here:
⇒ I/O button > CTRL tab
then scroll down to match effect block CC numbers to your MFC effects.
Controllers & Patch Changes
You may use a pedal that you want to control an Axe-FX parameter such volume or wah. You might even have an effect that switches a setting between different values (such as switching between a small amount of reverb and a high reverb level). This is a 2 step process on the Axe-FX:
- Set your CC number to any one the External Controllers under: I/O button > CTRL tab
- Attach a modifier to the Axe-FX setting you want to control, using the same External Controller
When you attach a modifier using an external controller, there is an option to set Program Change Reset (PC RST) off or on.
- PC RST = OFF keeps the setting from the previous patch. This is good for a volume pedal so you don't have any unexpected volume changes between patches.
- PC RST = ON uses the saved setting from the Axe-FX patch. This is good to get consistent behaviour when you select a patch.
The Axe-FX also allows you to attach a modifier (controlled by the MFC via an external controller) to effect block bypass parameters. Combined with the above options, this gives you a lot of flexibility in controlling effect states and whether they retain their settings from the previous patch or not. The MFC has similar options, so use either approach and make sure they're not working against each other.
Axe-FX II Model & Settings
All of the above settings make sure the MFC can send messages to your Axe-FX via MIDI OUT from the MFC connected to MIDI IN on the Axe-FX. If you wish to view information such as tuner and tap tempo from the Axe-FX MIDI OUT to the MFC MIDI IN, you will need to check the following settings.
To get started, select your Axe-FX II Model from the dropdown list on the Editor Other tab.
Displaying the Tuner & Tap Tempo
To display the Axe-FX tuner and/or Tap Tempo on the MFC, you will need to make sure those messages are being sent from your Axe-FX:
⇒ I/O button > MIDI tab > Send Realtime SysEx
You can set this to None, Tuner, Tempo or All (recommended).
Tap Effects and Auto-Delay
The MFC can switch on Tap Effects after a preset number of tap presses after a patch change. The number of presses is set on the Editor Other page, and of course Tap Effect settings are on the Effects page. You can disable tap Effects on the Editor Other page by setting the number of tap presses to “Off”.
The Axe-FX has a similar feature where it will set tap tempo here:
⇒ Global button > Config tab > Tap Tempo:
You can choose the “Last Two” tap presses or an “Average” of recent tap presses.
Likewise, you can set the Axe-FX to automatically turn on delay effects when a tap tempo is set: ⇒ Tempo button > Auto Delay (OFF or ON)
Using the MFC to control Tap Effects has an advantage in being able to turn on 2 (or more with library messages) specific effects. You also have the ability to set CC values to have Tap Effects set effect levels and other parameters.
The Axe-FX is simpler to set up and turns on all delay effects in the patch. So just use the method that suits you best.
Scenes and Seamless Patch Resets
The MFC has a useful feature of flashing the patch LED when effects have been changed. This makes it easy to see when you can press the patch footswitch to reset the patch and is seamless, with no audio dropout or effect switching glitches.
The Axe-FX has a feature of being able to select any scene in any patch by using custom mapping:
⇒ I/O button > MIDI tab > Mapping Mode = CUSTOM
Then use the next 3 lines to set which MIDI program (Map From Preset) maps to which Axe-FX patch (Map To Preset) with which scene (Map To Scene). For example, you can set it so that if you send MIDI patch number 120, it will select scene 3 of patch 27.
To get seamless resets using the Axe-FX's patch and scene mapping, you will need to make some settings that are not intuitive:
⇒ I/O button > MIDI tab > Ignore Redundant PC = ON
⇒ I/O button > MIDI tab > Scene Revert = ON
Scene Revert = ON recalls saved scene states between scene changes, and setting “Ignore Redundant PC” ON does NOT ignore redundant (repeated) PCs when Scene Revert is ON.
Reverb & Delay Trails
This tip really has nothing to do with the MFC. It's just general advice that if you want natural reverb and delay trails when switching them off an on, you should use the Axe-FX bypass option that turns their INPUT off and on. Likewise, a volume pedal should be placed BEFORE these effects for the same reason.
Bugs
There are no known bugs with the settings I use, but I don't use all features. There are hundreds of settings (which means millions of combinations) and there's only one of me, so I can't make any guarantees. I'm keen to make sure the firmware and editor work as described, so please let me know if you find any problems at info@gmarts.org

